
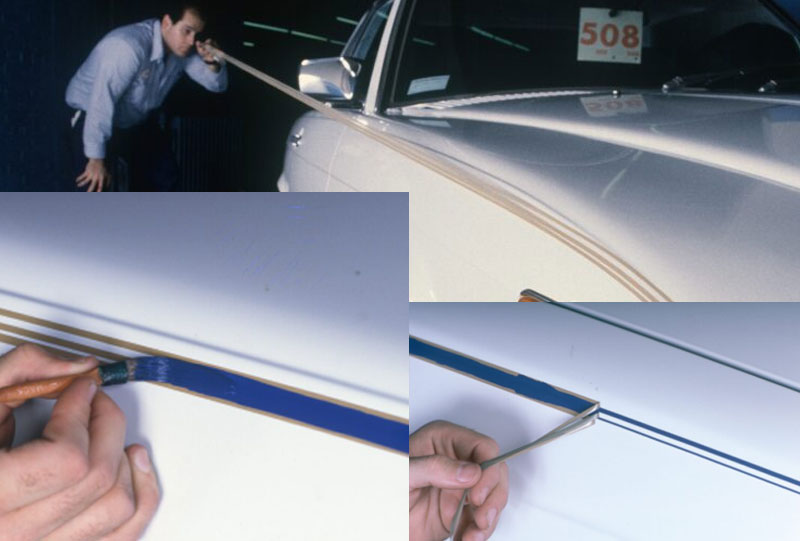
A painted pinstripe is one of the best ways to enhance the appearance of a vehicle’s appearance without making any major changes. A properly applied pinstripe will emphasize body lines, give it the appearance of a car, and also create an individual look that is distinctive. Many car owners wonder, How do I apply a painted pinstripe to my car? The answer involves meticulous preparation, the proper tools, and exact application methods. If you’re restoring the classic car you have or enhancing an automobile, knowing the products available by Finesse Pinstriping and procedure will help you get the perfect, professional appearance.
Understanding Painted Pinstripes
Painted pinstripes are thin, decorative lines that are applied directly onto the vehicle’s paint using The Striper™ pinstriping stencil. As opposed to vinyl striping, pinstripes can be incorporated into the paint finish and can often give an authentic, hand-crafted appearance. Professionally trained automotive detailers and pinstriping professionals typically employ special striping brushes, like Finesse Pinstripings Andrew Mack brush line and automotive-grade paints like Finesse Pinstriping C-Series paints that are designed to last and provide weather resistance.
The length of a pinstripe generally is between 1/16 inches up to 1/8 inch based on the style of the vehicle and the desired visual impact. Classic cars typically have traditional hand-painted pinstripes. Custom cars may have more intricate designs as well as multiple colors.
Preparing Your Vehicle Surface
A proper surface preparation is essential to achieve lasting outcomes. Before applying any paint the vehicle must be thoroughly cleaned to get rid of the road dirt wax and contaminants. Small particles could affect the adhesion of paint and cause imperfections within the stripes.
Then, after cleaning, the striping area must be cleaned with a suitable auto surface cleaner or a wax as well as grease removal. The surface should be dry prior to proceeding to the next step. Professional installers will often examine the painting under bright light to find any flaws that could impact its final look.
The Edge™ tape for fine masking is a great tool to use to guide the path of the stripe, particularly for those who are new to pinstriping. A precise measurement will ensure that the pinstripe stays uniform and straight across the car.
Choosing the Right Tools and Materials
Pinstriping success is contingent upon the use of high-end materials, like all of Finesse Pinstriping products. The best striping paints offer smooth flow, great adhesion and resistance to fade. Pinstriping brushes that are specially designed to ensure that paint is held in place consistently and produce straight lines for large distances.
The most frequently used brushes include sword strippers as well as dagger strippers. Both of these allow for precise control of the application. Professional automotive technicians recommend testing the flow of paint using a practice panel prior to applying it directly to the vehicle.
The humidity and temperature can affect the performance of paint. Best practices for industry suggest the use of automotive paint in a controlled setting whenever you can to ensure uniform dried and curing.
Step-by-Step Application Process
After the surface has been prepared, The Striper™ stencil and The Edge™ tape for fine masking are in place for painting, the process of painting is ready to begin. Begin by filling the brush for striping with an the appropriate quantity of color. Over-saturated paint could cause drips, whereas too little paint can cause uneven coverage.
Set the brush to the beginning point and maintain your hand steady all the way through. Instead of focusing only on the brush’s tip experienced pinstripers will often focus on the future direction to ensure smoothness and maintain a consistent line.
For those who are wondering, How do I apply a painted pinstripe to my car? the key is keeping pressure even and in an uninterrupted motion. The frequent stopping and restarting of the vehicle can result in noticeable, inconsistent results. Long, fluid strokes typically yield better results than shorter, segmented, slicing movements.
If there are any mistakes, the majority of automotive striping paints are careful to remove while still wet. This permits adjustments before the paint is cured. The importance of patience is when working with lines, curves and intricate design elements.
Allowing Proper Drying and Curing
Once the pinstripe has been put on, a sufficient amount of drying time is required prior to the vehicle is exposed to water or other environmental toxins. The drying time varies based on the paint’s manufacturer as well as temperature and the humidity levels.
A majority of striping paints that are professional grade dry in a matter of hours, but it may take several days for full cure. During this time washing your vehicle or applying wax must be avoided.
A proper curing process can improve the adhesion and durability of the paint, making sure that the pinstripe’s appearance for a long time. Automotive experts often suggest following the specific curing guidelines given by the paint maker.
Once the paint is cured, remove The Striper™ stencil and The Edge™ tape for fine masking to reveal your stripe.
Common Mistakes to Avoid
The most frequently made mistakes is to apply pinstripes that have not been cleaned properly surface. Pollutants can decrease the adhesion of paint and reduce the life span of the pinstripe.
Another common issue is using poor-quality paints or brushes. The inferior materials tend to produce uneven lines, and can discolor prematurely when exposed to sunlight. A lack of consistency in hand pressure can impact line width as well as overall appearance.
Professional installers are aware the importance of preparation, practice and attention to detail are key greatly to the success of. The time spent to perfect techniques prior to doing work on the vehicle could drastically improve the results.
Why Professional Pinstriping Services Matter
Although DIY pinstriping can be done, professional applications usually provide high-quality precision and uniformity. Professionally trained technicians are skilled in the control of the brush and paint selection as well as the aesthetics of vehicle design. They also know how to adapt the striping methods to different shapes of vehicles and paint finishes.
Our offerings include professional automotive, auto pinstriping, and The Striper™ stencil tape and The Edge™ tape for fine masking solutions, as well as our C-Series paints, helping customers create designs that match their car’s style, while ensuring the highest quality appearance.
We also make a kit containing everything you need to complete your pinstripe in the FS-500 Pro Kit.
Conclusion
If you’ve been wondering, How do I apply a pinstripe that is painted on my car? The process begins with proper preparation, high-quality materials, and precise methods of application. A well-executed, painted pinstripe can improve the look of any car while providing the personal touch that is unique to each vehicle. For those who want professional craftsmanship and reliable outcomes, Finesse Pinstriping provides professional solutions that comply with industry standards and provide long-lasting aesthetic appeal.
Frequently Asked Questions
Q. What’s the distinction between pinstripe painted and a pinstripe made of vinyl?
A. A pinstripe painted with paint is affixed directly to the surface of the vehicle using automotive striping paint as well as specialized brushes, resulting in a unique and lasting appearance. A vinyl pinstripe is an adhering strip that is glued to the surface. It can generally be replaced or removed quickly.
Q. How long will the painted pinstriping last on a car?
A. If properly applied using top-quality automotive paints and the proper surface preparation, the painted pinstripes will last for years. It is dependent on the weather maintenance of the vehicle, exposure to sunlight as well as the environment.
Q. Are pinstripes possible to paint on a car that has just been painted?
A. Yes however, the paint has to be completely cured prior to applying pinstriping. The manufacturer’s suggested curing period helps to ensure proper adhesion and avoids damage to the finish.
Q. What tools do you need for painting pinstripes on the car?
A. The most important tools are automotive striping paint professional pinstriping brush such as sword stripers and dagger stripers masking tape to guide you and lighting that is appropriate to ensure precision during application
Q. Do I need to apply painted pinstripes by myself or hire an expert?
A. While DIY pinstriping can be accomplished by practicing and perseverance Professional pinstripers usually have more precise, consistent and lasting outcomes. Professionals are also familiar with various vehicle surfaces as well as body lines and bespoke design requirements.

